Tuesday 30 September 2014

Tropical Italian Pasta #glutenfree #glutenfreerecipe #pasta

Our blog is about East meets West culinary. Today, we would like to share a variation of popular Thai Pineapple Rice. We have used Barilla's new gluten-free pasta instead of rice to cook this dish. Full of creamy prawn flavour with a little pineapple tartness, this perfect combination is sure to both surprise and please when served.

Ingredients:

400g large Tiger Prawn - peeled with tail on.
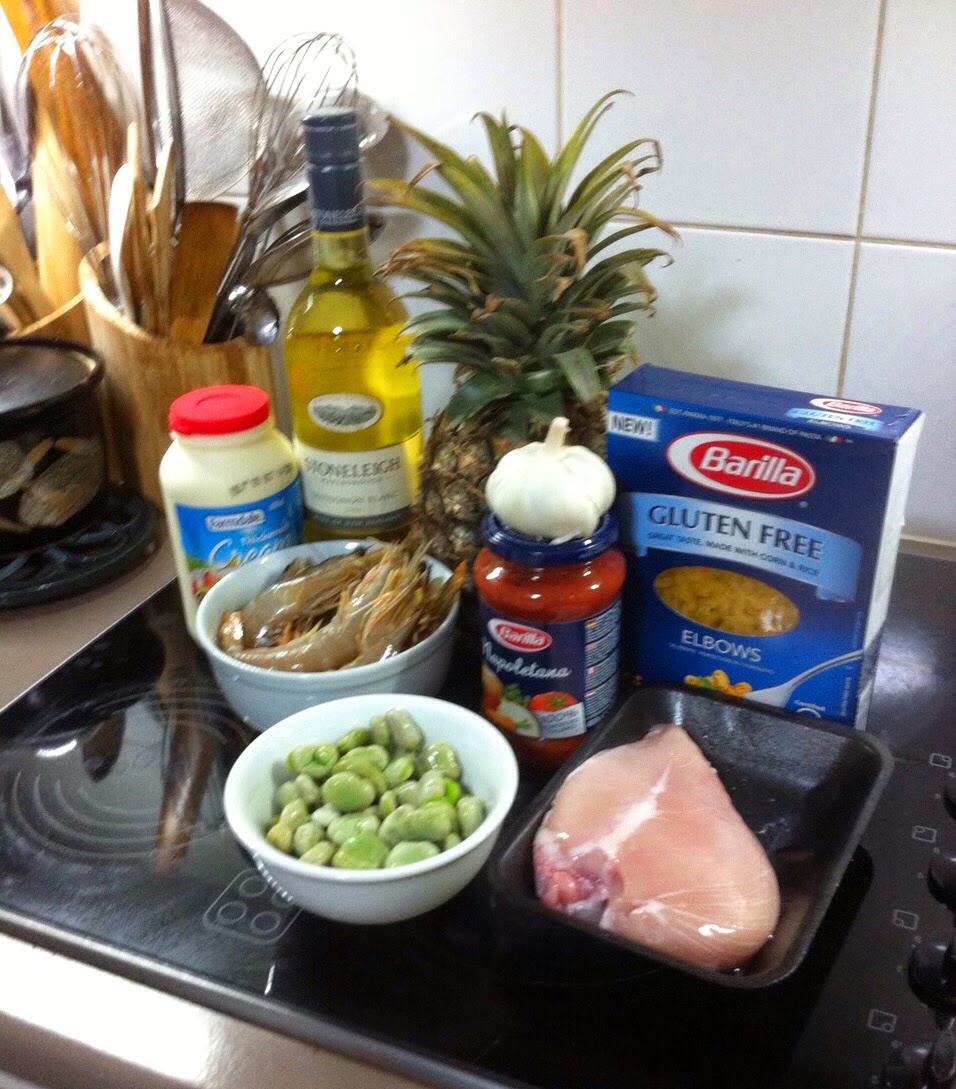
250g  Chicken Breast - diced
1 cup Broadbeans - shelled
1 large (or 2 medium) Pineapples.
200g Barilla gluten-free Elbows
1/2 cup Barilla Napoletana Sauce
2/3 cup Thickened Cream
1/4  cup White Wine
1.5 cup grated Cheddar/Mozerella Cheese
1/2  cup Parmesan
30g Butter 
2 cloves Garlic - chopped finely
1-2 tablespoon Flat Parsley - chopped
Salt and Pepper

Method:

Preheat oven to 210C
Bring water to the boil in a large saucepan with salt and 1 tablespoon olive oil.
Cook Barilla Elbows for about 4 minutes until half soft.
Drain and wash with cold water to avoid the pasta becoming softer before cooking in the pan.
Cut pineapple into halves.
To remove the flesh from the pineapple so you can present this dish in the shells, run a sharp knife around the edge of the pineapple.
Score the flesh so it can be removed. This may also be done using a melon baller.
Set flesh aside.  Use this flesh to make juice or jam from our recipe previously on the blog. 
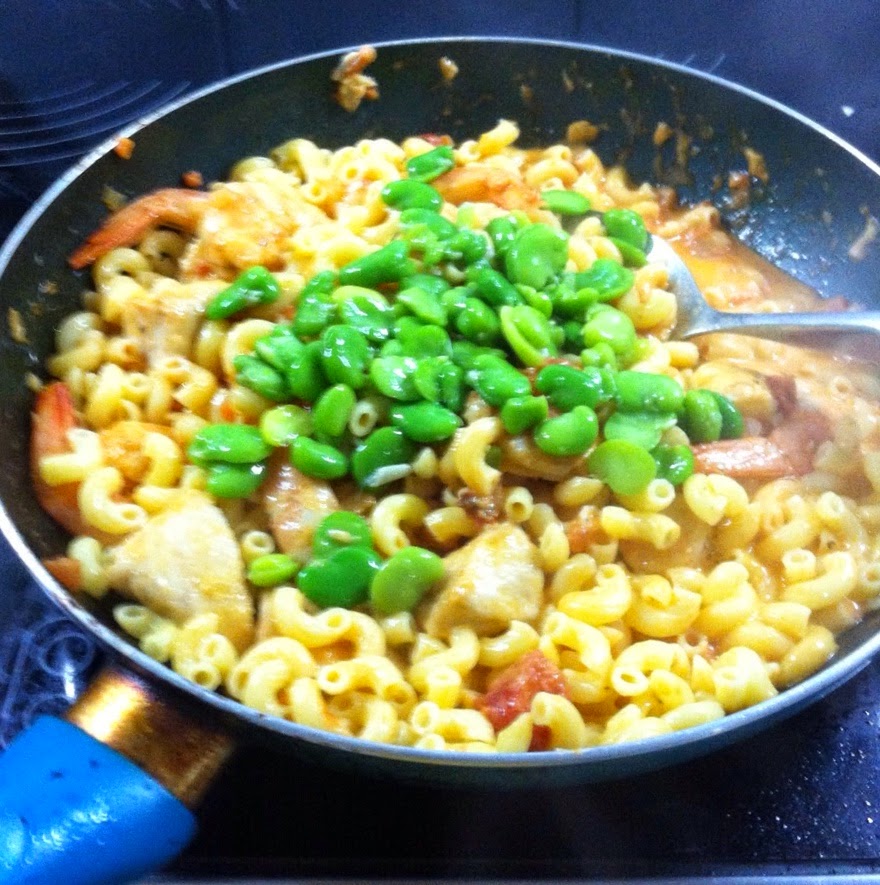
Heat a saucepan with butter, stir fry garlic, chicken, prawns and broadbeans for a few minutes until caramelized. (If using frozen broadbeans, add in last 2 minutes)
Add white wine, then napoletana sauce and thickened cream.
Boil for 2-3 minutes on high heat.
Add elbow pasta and Parmesan, cook until creamy and the sauce is reduced
Add parsley and seasoning to taste.
Pour the pasta mixture into the pineapple until full.  Cover with grated cheese.
Bake in very hot oven about 10 minutes or until cheese melts and little brown.
Add a little chopped parsley on the top.

Serves 3-4  people.

Tips:
  • Seafood mix or only chicken or roast vegetables can be used to cook this dish. So if seafood is not your thing or you prefer vegetarian there is a variation for you.
  • If you prefer a richer colour, add more napoletana sauce and less thickened cream.
  • If you pick pineapples with the head attached to give tropical look on serving, soak the head in water several hours and wrap with aluminium foil before putting into the oven to avoid it becoming dry.

Contact: lee.leehocklai@gmail.com


Thursday 25 September 2014

Almond Banana Tart #glutenfree #glutenfreerecipe #glutenfreepastry

This stunning tart is the perfect combination of  nuttiness and fruit. It is not too sweet, and when served with thickened cream or ice cream, it makes a fantastic dessert. I love it cold from the fridge for a quick snack when I have that craving for something extra mid-afternoon.


Pastry

Ingredients:

180g Butter
2.5 cups gluten-free Plain Flour
1 Egg, lightly beaten
1/4 cup Iced Water
1 teaspoon Sugar
Pinch of Salt


Method:

Oil spray a 24cm round loose base flan tin.
Rub butter, flour, salt and sugar in a bowl with your fingers until resembles breadcrumbs.

Add egg and iced water. 
Mix well with a knife or spatula until it forms into a ball.
Knead until smooth and does not stick to your hand. 
Add  more flour or iced water as necessary.
Roll the pastry between 2 sheets of baking paper until large enough to fill the flan tin. 

Remove the top paper and lift up the pastry with the bottom paper.
Carefully ease the pastry over the base and side, press gently against the surface of the tin. 
Prick the base with a fork then refrigerate for about 20 minutes.
Turn the oven to 180C. 

Bake the pastry for 12 minutes. (You don't need to cover the pastry base with baking paper and beans)

Almond Filling

Ingredients:

125g Butter
3 Eggs
1/3 cup Caster Sugar (Use 1/2 cup if you are a sweet lover )
1 and 1/3 cups Ground Almond Meal
2 tablespoons gluten-free Self Raising Flour


Method:

Beat the butter and sugar in a bowl until soft and smooth.
Add eggs one by one. 
Combine with flour and ground almond meal.
Pour into the pastry shell.

Topping

Ingredients:

3-5 Bananas
2 tablespoons Lime Jam (or any jam you prefer)
1 tablespoon Warm Water
2 drops Lemon Juice


Method:

Peel bananas and cut into slices, but not too thinly. 
Decorate and cover the almond filling.
Mix the jam, lemon juice and warm water together, then brush onto the banana slices.
Bake in 170C about 45 minutes or until touch firm in the middle. 

Take out the tart from the oven, brush  with leftover jam water.
Great to serve warm with thickened cream or vanilla ice cream.

 
Tips:
  • Usually I use same pastry recipe to make sweet tarts and savouries. So why not make double, half for the main dish and half for dessert. 
  • Substitute sliced pear, apple or any other fruit in the topping.. 

Contact: lee.leehocklai@gmail.com 


Monday 22 September 2014

Masala Curry Beef with Spicy Turmeric Rice #glutenfree #glutenfreerecipe #curry

There are thousands of curries in the world. A curry with the same name may be cooked very differently by different people, resulting in a different flavor. Usually I prefer hot, stronger, spicy curries, but it is impossible that everyone will like their curry this way.  Make little changes to the curry paste combination and make your curry the type that you prefer.


 Ingredients:
 
1 kg Diced Beef
1 large Onion - sliced
2 Carrots - cut pieces
3-4 Potatoes - cut pieces
1 cup Coconut Cream
10 fresh/dry Curry Leaves 

1 tablespoon Fenugreek Seed
4 Cardamon Pods, slightly crushed
1 Cinnamon Stick (about 2 inch)
4 Cloves
2 Star Anise 

Salt, Pepper and Sugar to taste

Curry Paste

Ingredients:

1/2 cup Curry Powder
1 teaspoon Turmeric Powder
1.5 tablespoons Coriander Powder
1 teaspoon Cumin Powder
1 teaspoon Garam Masala
4 Red Shallots
3 cloves Garlic
2 inch Ginger
2 Ripe Tomatoes - diced

 
Method:

Bring water to the boil in a saucepan, place diced beef into the saucepan and cook for about 5 minutes and drain.
Put all curry paste ingredients in the food processor and combined fine, add a little water if too dry.
Heat a large saucepan with 1/3 cup oil. 

Stir fry onion, curry leaf and all spices for several minutes. 
Add curry paste and cook on medium heat until aromatic. 
Add beef and stir well.
Add water till saucepan half full or until beef is covered. 

Close with lid and bring to the boil. 
Turn to medium-low heat and simmer for 1.5 hours.
Add carrot and potato to the curry, cook on medium heat for another 30 minutes. 

If the curry is not thick enough, turn to high heat without the lid to reduce. 
Add coconut cream and seasoning and cook another 10-15 minutes or until sauce is reduced.

Turmeric Rice 
 
Ingredients:

 1.5 cups Basmati rice, (you can cook more if you like)
1 tablespoon Turmeric Powder
1 inch Cinnamon Stick
4 Cloves
2 Star Anise
4 Cardamon Pods
1 teaspoon Salt
30g Butter


Method:

Wash the rice with water twice. 

Then cover the rice with cold water to a depth of about 2cm. 
Add all ingredients and let stand about 10 minutes. 
Cook in rice cooker. 
If you not have rice cooker, you can cook in a saucepan on the stove. Remember to turn to low heat and cover the lid when water 90% dry out. Then slow steam about 15 minutes.
Serves 4

Enjoy. 

Tips: 
  • Add sour cream or yoghurt on top of curry if you like.
  • Use cheaper cuts of diced beef such as chuck steak, skirt steak or gravy beef as it is ideal for slow cooking and becomes soft and tender, full of the wonderful aromatic spices of the curry. 
  • Saffron powder or strands can be added when cooking the rice.

Contact: lee.leehocklai@gmail.com

Friday 19 September 2014

Roast Pumpkin and Spinach Penne Pasta #glutenfree #vegetarian #italiancooking

Do you have the same trouble that I do when cooking dry gluten-free pasta?  The pasta is very sticky, almost as if a cup of corn flour has been added to the boiling water. The boiled pasta also breaks into small pieces while cooking in the saucepan. Much gluten-free pasta has a strong rice flavour which can be a little disconcerting and obviously makes if different from 'normal' pasta. Recently, I was given the opportunity to trial some Barilla gluten free pasta which has just come onto the market. Barilla is a popular Italian brand around the world. I have used Barilla gluten-free penne pasta for tonight's recipe and I am very happy with the results. I had none of the above mentioned problems and most importantly, the taste is fantastic. It has the classic pasta flavour, not the strong rice flour flavour of many other gluten-free pastas.
Tonight, I am sharing with you an easy, delicious, vegetarian dish made with Barilla gluten-free pasta. Try this pasta, and let me know if you agree with my comments.

Ingredients:

1 box Barilla gluten-free Penne (340g )
1 jar Barilla Napoletana Sauce (400g )
1.5 cup Roast Pumpkin*
100 g Baby Spinach
120g Sundried Tomato
1/4 cup Pinenuts
1/4 cup White Wine
1/3 cup Olive Oil
2 cloves Garlic - chopped finely
Parmesan Cheese
Chopped Parsley/Basil
Salt and ground Pepper

Method:

Roast Pumpkin

Preheat oven to 200C.
Place 1.5 cup diced pumpkin in the baking tray, add olive oil, salt, chopped rosemary and parsley (or dried mixed herbs).
Bake in the oven about 20 minutes until 90% soft. Remember the cooking time may different due to the type of pumpkin and sizes cut.
Check after 15 minutes.

Pasta

Bring water to the boil in a large saucepan, add 2-3 tablespoons salt.
Place the penne into boiling water on high heat for about 8-9 minutes**.
Stir well 2-3 times during cooking.
Drain water, add 2 tablespoons olive oil, mix well.
Pour 1/3 cup of olive oil in a large pan, add garlic, pinenuts and roast pumpkin. Stir fry for a few minutes.
Add white wine and napoletana sauce.
Add penne and stir fry another 3 minutes.
Add baby spinach, sundried tomato, chopped parsley. 
Add a little Parmesan at the last minute before plating up.
Serves 4

Tips:

Add more pinenuts and Parmesan before eating if you prefer.
** I cook my pasta for about 8 minutes as I cook it again with the sauce. If you prefer soft pasta, you can cook for a few extra minutes. But, remember the pasta becomes softer after you drain and do not cook immediately.

Contact: lee.leehocklai@gmail.com


Sunday 14 September 2014

Asparagus, Leek and Bacon Quiche #glutenfree #glutenfreerecipes

This beautiful quiche is perfect for a main meal when served with salad or cut into small pieces and serve as finger food at your next gathering or party. You can add prawns, other cold meats, and any other vegetables you wish for a variation of the quiche.


Pastry  

Ingredients:

180g Butter - room temperature
2 cups gluten-free Plain Flour
1 Egg - lightly beaten
3 tablespoons Iced Water*
1 teaspoon Caster Sugar
Pinch of Salt
* You may need extra iced water if the pastry is too dry. Add more flour if too wet... the pastry must not crumble or stick on your hand after kneading.

Method:

Spray a large pie plate with olive oil spray.
In a large bowl, rub the butter, salt, sugar and flour with your finger until the mixture resembles breadcrumbs. 
Add egg and iced water, stir with a knife or spatula until the mixture comes together. Then knead the pastry until smooth.
Place the pastry between baking paper, roll until large enough to line the pie plate. 
Lift into the pie plate and ease into the sides, trim edge. 
Prick the base with fork and refrigerate about 20-30 minutes.

Filling
Ingredients:

3 rashers of Middle Bacon - rind removed,diced
1 Leek - sliced finely
1 cup fresh Asparagus - diced
4 eggs- lightly beaten
3/4 cup Milk
1/3 cup Thickened Cream
1 cup Cheddar Cheese
30g Butter
Salt, Pepper

Method:

Preheat oven to 180C.
Heat butter in pan. 
Saute leeks and bacon for about 4 minutes or until onion is soft. place aside and allow to cool.
In a large bowl, beat egg, cream and milk together. 
Add leek, bacon, asparagus, seasoning and half of the cheese.
Place the pastry into the oven and bake for about 12 minutes. You don't need to use any beads or rice to cover the pastry base as it is only in oven for 12 minutes. 
Pour all the filling mixture in the pastry and add remaining half of cheese on the top. 
Bake for about 45 minutes or until set in the middle.
Serve hot or cold.

Tips:
  • The filling can be poured directly into the uncooked pastry shell and baked for about 1 hour. But the bottom may be a little under-cooked if the pastry too thick. So it's best to bake the pastry 12 minutes first. 
  • Serve with tomato sauce or sour cream.

Contact: lee.leehocklai@gmail.com


Thursday 11 September 2014

Roast Vegetable Pizza #glutenfree #vegetarian #thinandcrispy

This is gluten-free pizza base, so it may not be as soft as normal pizza bases. But, I made it as a thin and crispy, added home cook roast vegetables and Napoli sauce, to create a gorgeous vegetarian pizza. filled with all natural ingredients and absolutely no processed items. You can add ham, salami, seafood.....any topping you like. And, don't forget to add our home made barbeque sauce for a different flavour. 


 Pizza Base

Ingredients: 

2 cups gluten-free Plain Flour
1 cup Rice Flour
1/2 cup Potato Starch
1 Egg, light beaten 

1 teaspoon Salt
1/2 teaspoon Sugar
2 tablespoons Oil
2 tablespoons Dry Yeast
1 cup luke warm Water


Method:

To prepare the pizza bases, place all the ingredients together in a large bowl. Stir with the wooden spoon, then use your hand to kneed till smooth - add extra flour or water if too dry/ wet. 
Place the dough on lightly floured baking paper, Roll thinly - This quantity will make 2 thin and crispy pizza bases.
Place pizza base on pan greased with oil spray. 

Cover with a tea towel and rest at room temperature for about 45 minutes - if it's cold weather, rest in the warm oven with a cup of hot water in bottom.
If using a pizza oven, top with roasted vegetables etc and place straight into the pizza oven  If using a normal oven, bake the pizza base in 220C for 6 minutes.
Spread some Napoli sauce on the pizza base, add roasted vegetables. 

Cover with Mozzarella cheese and a little Parmesan. 
Bake in very hot oven of 230C for 12-15 minutes or until little burnt at side.
Cut into slices and serve with roasedt pinenuts and snowpea sprouts. 


Roast Vegetables

Ingredients: 


2 Potatoes - diced
1 Onion - diced
1 cup Pumpkin - diced 

1/2 red Capsicum - diced
1/2 Eggplant - diced
1 Zucchini - diced
2 cloves Garlic - chopped finely
Some fresh chopped herbs, such as Rosemary, Oregano, Parsley, Thyme.. or 1 teaspoon of Dry Herb Mix
Salt and Pepper.
1/2 to 1 cup Napoli Sauce ( you can check recipe from our blog )
1 cup Mozzorella cheese
1/3 cup Parmesan
1/3 cup roasted Pinenuts
Snowpeas, Sprouts or Rocket or Baby Spinach


Method:

Preheat oven to 200C
Place potato and onion on a large baking tray, add some olive oil. Put in the oven for 10 minutes.
Add other vegetables, garlic, herb mix and seasoning to the baking tray. 

Add more olive oil and roast until all vegetables are soft - about 20 minutes. 


Tips:

  • Do not worry that your pizza bases are a little fragile - This is due to having no gluten in the flour. Nobody will care after you put on the toppings.... 
  • Make extra roast vegetables, and keep leftover vegetables for cooking Spaghetti Primavera (we have shown you on our blog before)
  • I made 2 pizza bases, another one is half Hawaiian and half salami with barbeque sauce... 

Contact: lee.leehocklai@gmail.com


Sunday 7 September 2014

Tempura Chicken and Vegetables #glutenfree #tempura #japanese

Who does not like Japanese Tempura?? This is light and crispy deep fried meal, that melts in your mouth. I have previously worked as a Japanese chef for several years. So. I assure you that this tempura is not any different to the real thing, although we have changed to gluten free ingredients -  the tips are always use ice water and some technology skills when deep frying.
Due to my partner not eating seafood, I have used chicken and vegetables for this meal. The sauce may be made thicker and sweeter to your taste. I will show you the pure tempura prawns and sauce another time...


Ingredients:

A: 

1 Chicken Breast, cut into long, thin slices
1/2 egg, lightly beaten 

1 tablespoon Sake (rice wine)
3 tablespoons gluten-free Corn Flour
1 teaspoon Minced Ginger 

Salt and Pepper
Vegetables you prefer, such as :- sweet potato, pumpkin, potato, carrot, zuchinni, bean, asparagus, brocolli, capsicum, okura, onion....The vegetables that are harder need longer cooking times, so cut them into thinner slices.

B:

1 cup gluten-free Plain Flour
3/4 cup Ice Water


C: 

2/3 cup homemade Teriyaki Sauce (Please check our recipe )*
1/3 cup Water
2-3 tablespoons Sugar
1 teaspoon Hon Dashi (Japanese fish/dashi stock)

Steamed Rice
Pickle ginger, if necessary**
About 1/2 cup extra gluten-free Plain Flour


Method:

Heat hot oil in a large deep pot/wok. If using a  deep fryer, heat to 190C.
Marinate all ingredients A for about half hour.
Mix ingredients B to become smooth tempura batter, I suggest you add some ice in the batter to keep it cooler.
Pour ingredients C in a pot and boil until reduce and thicken sauce to 50%.
Place the extra flour on a plate.

Remove vegetables and chicken from the marinade.
Lightly cover the vegetables and chicken with flour.
Cover in the tempura batter and deep fry in the hot oil. Remember you must shake the chicken and vegetables about 5 seconds in the hot oil before you separate them from your hand - it will let the batter become crispy after cooking.
Due to most home kitchens not having a large deep fryer as in restaurants, break into several batches to deep fry them. Make sure the oil is hot enough each time, when putting batches in the oil. Keep the ready cooked vegetables and chicken warm in the oven on medium heat.
Deep fry all the vegetables same as chicken. Some vegetables may need longer cooking times. Use your eye and finger to check the tempura, the best result is both side are crispy. Let them stand on a tray which has paper towel in the bottom.


To serve: 
 
Place steamed rice to half way up the bowl. 
Plate up with tempura chicken and vegetables. 
Poor over some of the sauce. 
Have some pickle ginger at the side if necessary.
* If you not have home make teriyaki sauce, you can use :-
1/2 cup Water
1/2 cup Japanese Soy Sauce
1/4 cup Mirin
1/2 cup Sugar
1/4 cup Sake
1.5 teaspoon Hon Dashi (Japanese dry fish stock)
Boil all ingredients until reduce thicken to about 40%


** You can buy many kind of pickle eggplant, ginger, cucumber...in local Asian/ Japanese groceries shops.


Tips: 

Home stoves are not as hot as restaurants. You will need to  deep fry for a  longer time.
Use new oil to deep fried tempura so the colour will be better and lighter.

You can use some gluten-free dry rice noodle or spaghetti or angel hair to deep fry with some tempura batter. Sprinkle, then toss, with some salt and decorate on the bowl. 

Contact: lee.leehocklai@gmail.com


Tuesday 2 September 2014

Choc Orange Jaffa Cake #glutenfree #glutenfreerecipe #glutenfreebaking

This  is a soft, light and moist cake that is suitable to serve at anytime. This is a two layer cake so you can add any flavour you like :- coffee, vanilla, strawberry, chocolate, green tea.... I baked a large cake (40 x 22cm) and it is still very soft and moist after three days. You can halve the ingredients to make a medium sized cake if you wish.


Ingredients:

Gently fold whisked egg whites into the mixture
10 large Eggs, separated
180g Caster Sugar (Add more if you like a sweeter cake)
100g Vegetable Oil
80ml Milk
150g gluten-free Self Raising Flour
Orange Juice from 1 Orange, about 1/3 cup
Orange Rind from 1 Orange
40g Cocoa Powder + 1/3 cup Warm Water
1 teaspoon Cream of Tartar
Pinch of Salt

Method:

Preheat oven to 170C
Grease a large baking tray base and line with baking paper.
Sieve self raising flour 3 times
In a large bowl, cream the egg yolk, half of the sugar, oil, milk, salt until smooth.
In another large bowl, whisk the egg white and cream of tartar for 2 minutes, add the other half of the sugar. 
Whisk until stiff peaks form.
Add half whisked egg white and all flour into the egg yolk mixture. 
Fold in well with plastic spatula.
Add the other half of egg white.

Separate the mixture to 2 parts : 

Part 1 -Mix with orange juice and rind. 
Part 2 - Mix with cocoa powder combined with water.

Remember to stir gently when you add the egg white as this makes the cake soft and fluffy after  baking.
Pour the chocolate mixture onto the bottom of the pan and spread well. 
Pour the orange mixture on the top and spread.
Bake in oven 170C first 15 minutes. Then change to 160C and bake another 45 minutes or until the skewer comes out clean from the middle.
Take out the cake from the oven and rest in the tray for 10 minutes. 
Use a small knife to go around the edges to loosen.
Turn out from the tray and let it cool on the rack upside down.
Cut into small pieces and store in airtight container.

Tips:

You can use melted butter to replace the vegetable oil. 
Sprinkle with icing sugar or serve with cream if you like.

Contact: lee.leehocklai@gmail.com